Sanctions Lists – User Manual
Effective from: December 31st, 2019.
Chapter 1. Document Information
This document is the user documentation of the Sanctions lists module version 1.0. This document contains information on navigation in the sanctions list module available on the Hyperflow analytical platform available at https://hyperflow.eu/client/.
Chapter 2. Sanctions Lists module capabilities
The Sanction Lists module is used to check whether a given person, company or organization is on sanction lists.
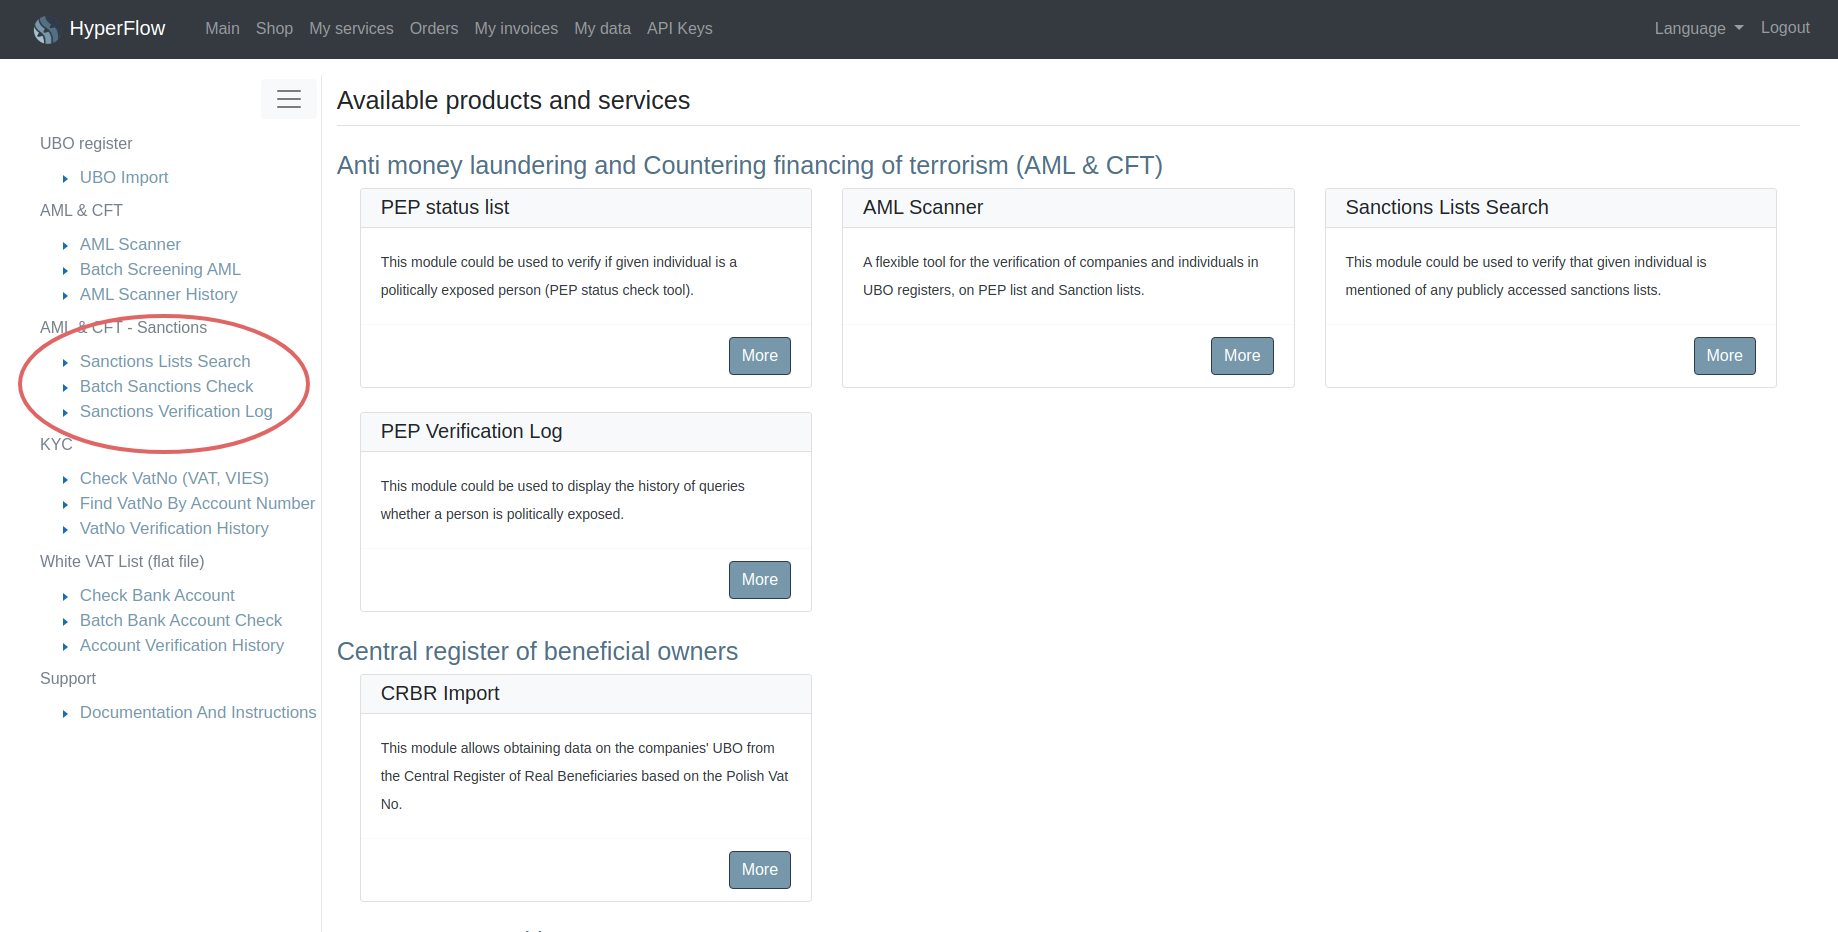
The package includes services:
- Sanctions Lists Search
- Batch sanctions check
- Sanctions verification log
Access to individual services is located in the side menu (item 1 in Figure 2.1).
As part of the demo licence you receive 5 free requests to test the services. In the main view of the Sanctions Lists Search and in Batch Sanctions Check in the upper right corner of the screen there is a balance counter and a quick path for replenishing the balance. When the balance runs out, the service will automatically become inactive.
Chapter 3. Sanctions Lists – verification
The Sanctions Lists service allows you to verify people, companies and organizations whether they are on sanctions lists using their first name and surname or company name.
3.1. Single verification
Figure 3.1 shows the basic Sanctions Lists panel, which is used for single verification. Point 1 is a field where you should enter the name and surname of the checked person or the name of the company or organization. Point 2 marks the types of lists that we want to check: lists for natural persons and lists for companies and organizations. By default, both options are selected. The “Search for sanctions” button sends a query to the server (item 3 in Figure 3.1).
The link “Mass verification” (item 4 in Figure 3.1) redirects you to the mass input panel.
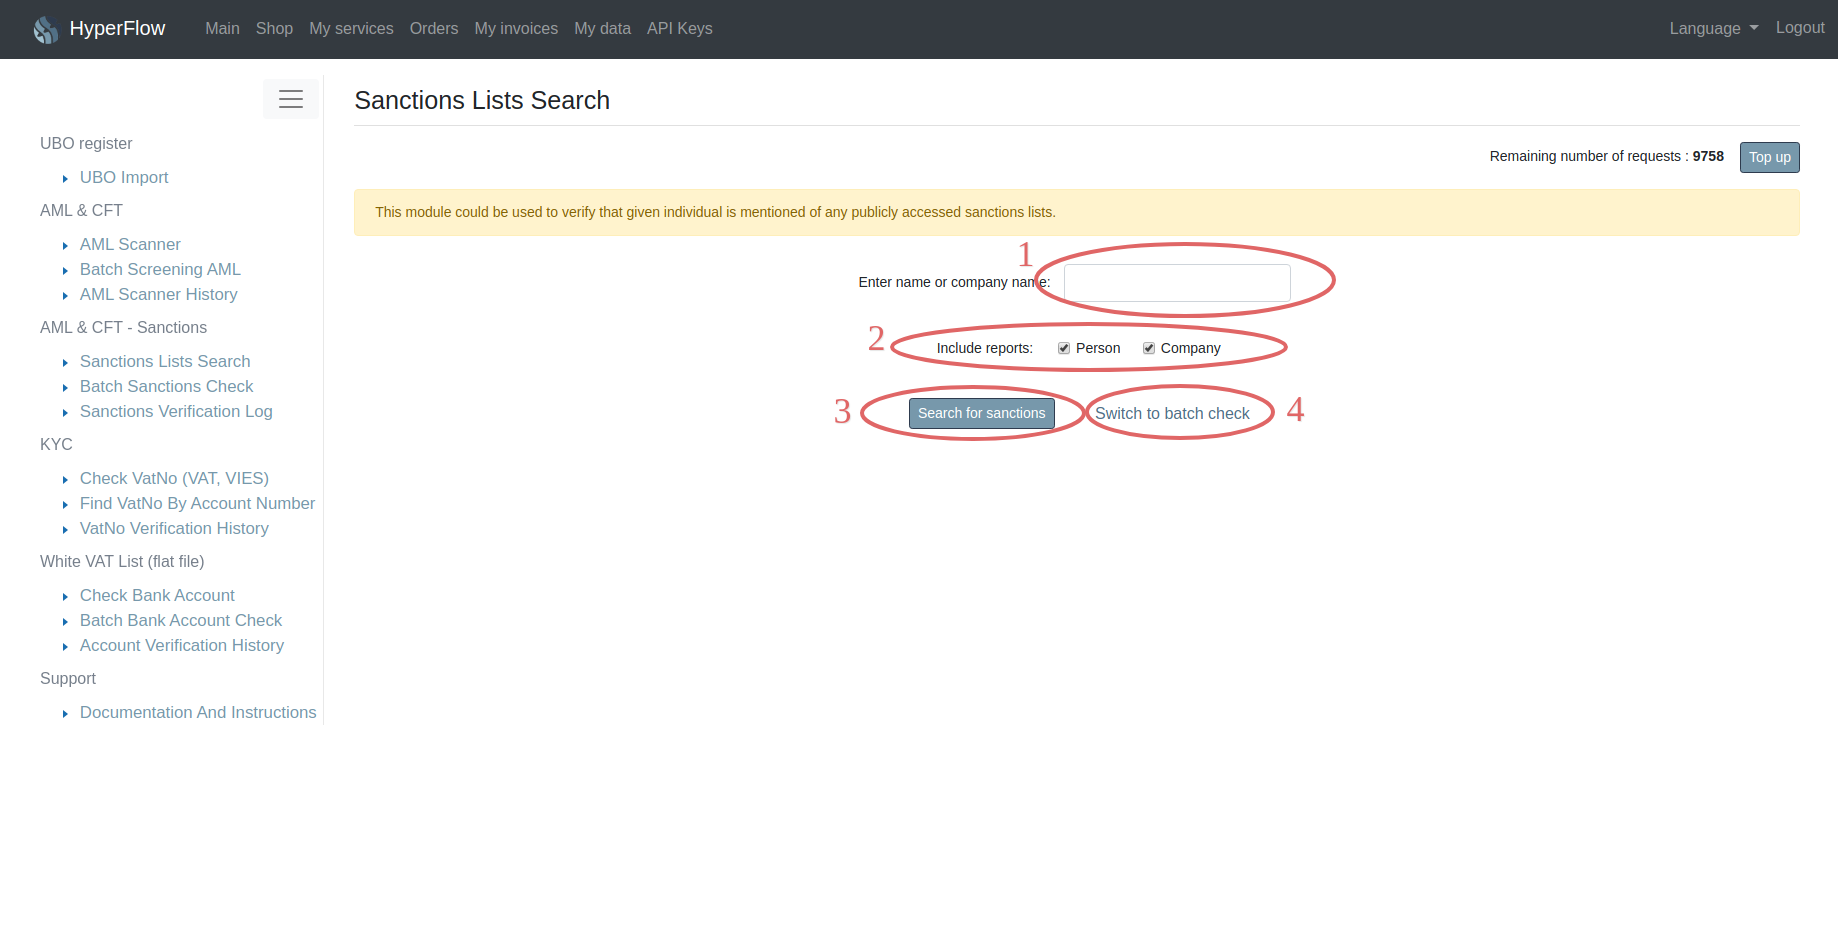
The result of a single query is a report. Its types details we will discuss in section 3.2. of this documentation.
3.2. Batch verification
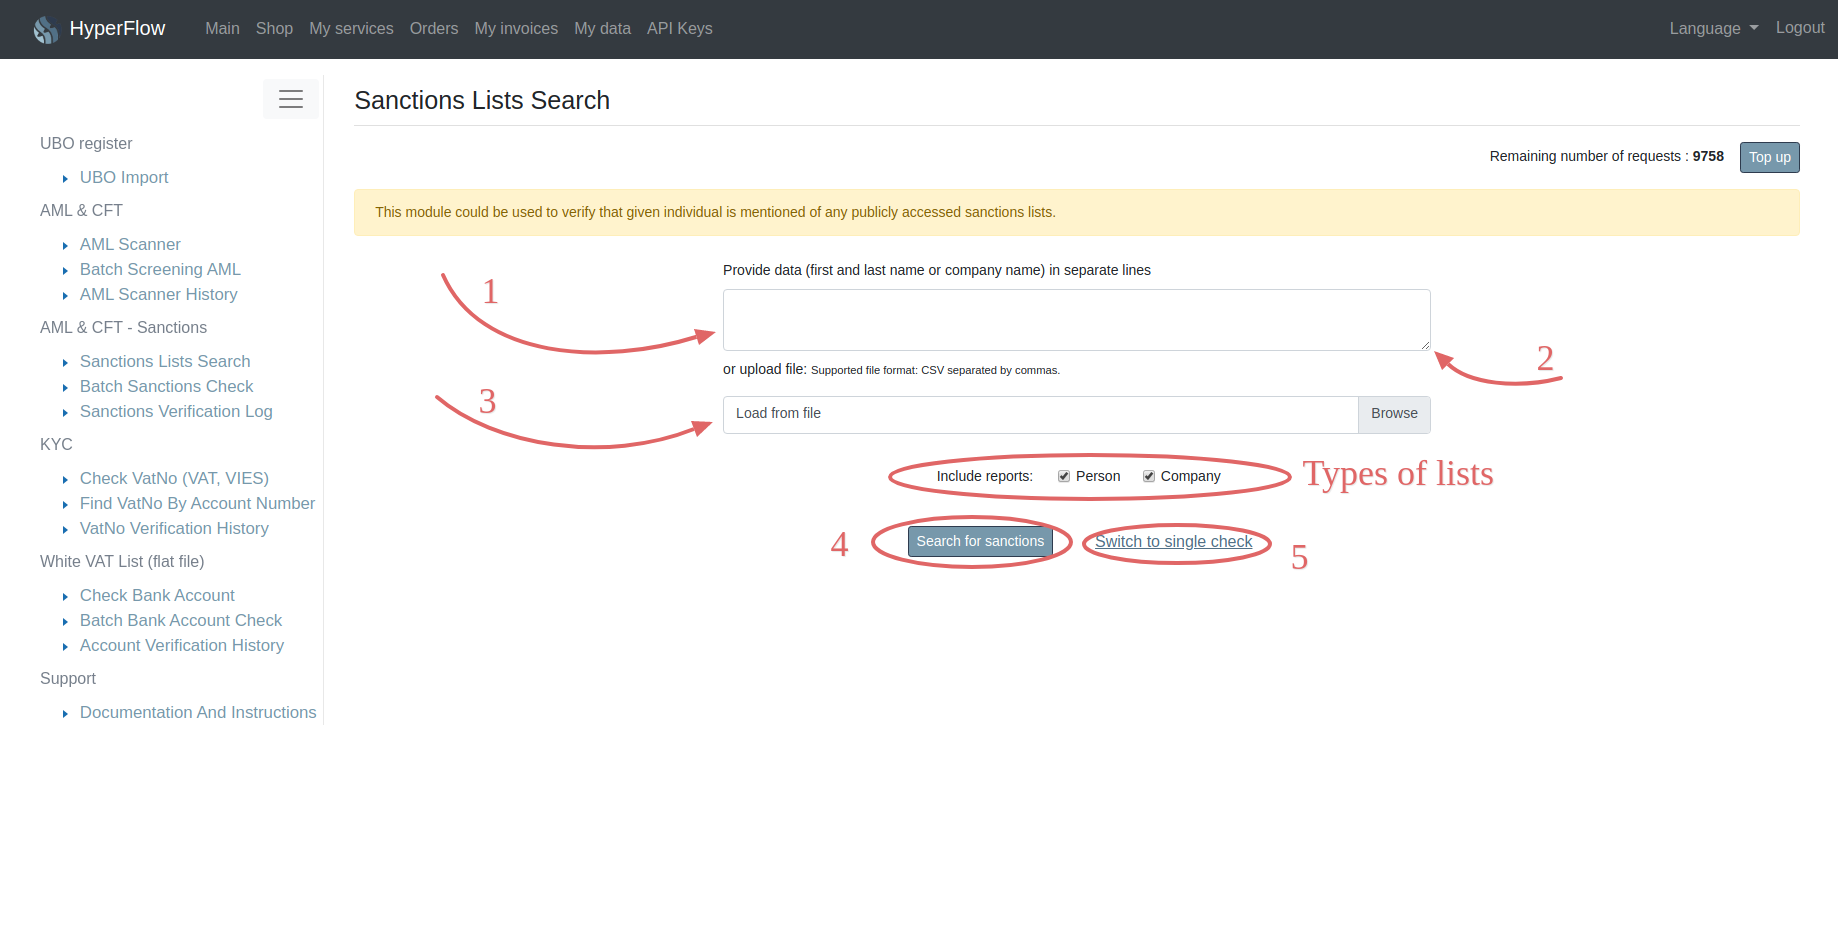
There is no difference between Batch Verification panel and Single Verification panel, except for the data entry window itself. In Figure 3.2, the dialog box for entering data is marked with point 1. This window in the lower right corner has a marker that allows you to change the size of the window (point 2 in Figure 3.2).
Correct data entry in the dialog window: each line contains data of one person / company. To enter the data of another person / company, click the “enter” button.
To enter data from a csv file, use the search engine (point 3 fig 3.2). After entering data into the dialog box or selecting the path to the csv file with data for verification, click “Search for sanctions” to send a query to the database.
You can return to the single verification at any time by clicking the “Single verification” button.
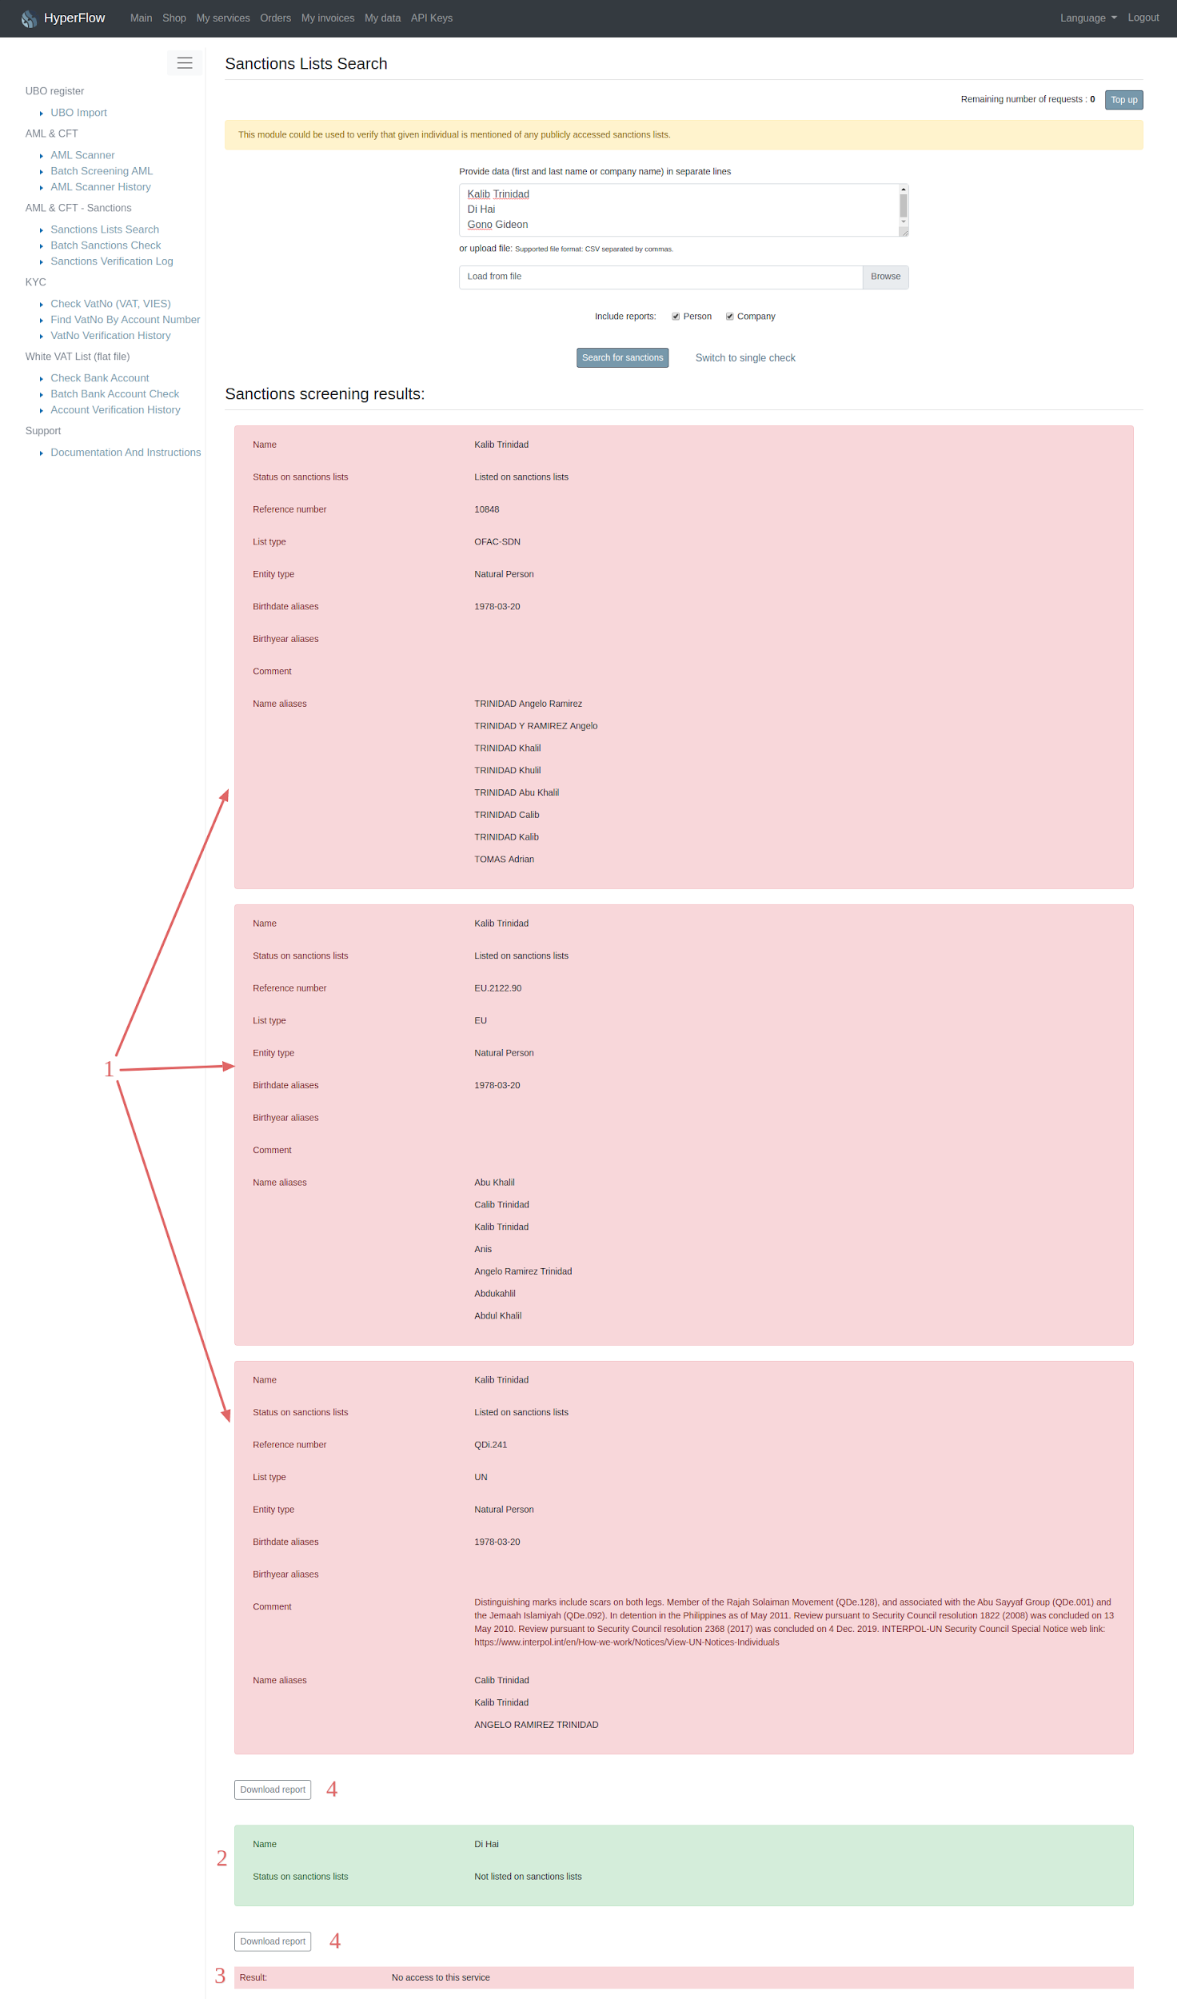
Checking data by mass verification is shown in Figure 3.3.
The following data have been correctly entered in the dialog: names and surnames on separate lines – separated by the “ENTER” sign.
The verification returned information of 3 people:
- Kalib Trinidad
- Di Hai
- Gono Gideon
The results of the verification are presented in the order of the query, however, one person / company may be on several sanctions lists. Figure 3.3 point 1 presents three pieces of information about Kalib Trinidad on different sanctions lists.
Point 2 in the figure is a report of a person who does not appear on the sanctions lists.
Point 3 has been marked with the return message that the query limit runs out.
Under each successful verification, there is a button “Download report” (fig. 3.3, point 4).
Reports are individual for each of the verified persons / companies in PDF format.
Collective, monthly verification reports are available in the Sanctions Verification Lab tab.
Chapter 4. Automatic verification
4.1. What is Batch Sanctions Check for?
It is an automatic verification, which allows for regular, automatic checking our contractors on sanctions lists. This service allows you to completely get rid of the hassle of verifying companies and cooperating persons. To configure automatic verification:
- activate automatic analysis,
- configure automatic data download or enter this data manually.
4.2. Automatic verification settings
The main panel of automatic verification is shown in Figure 4.1.
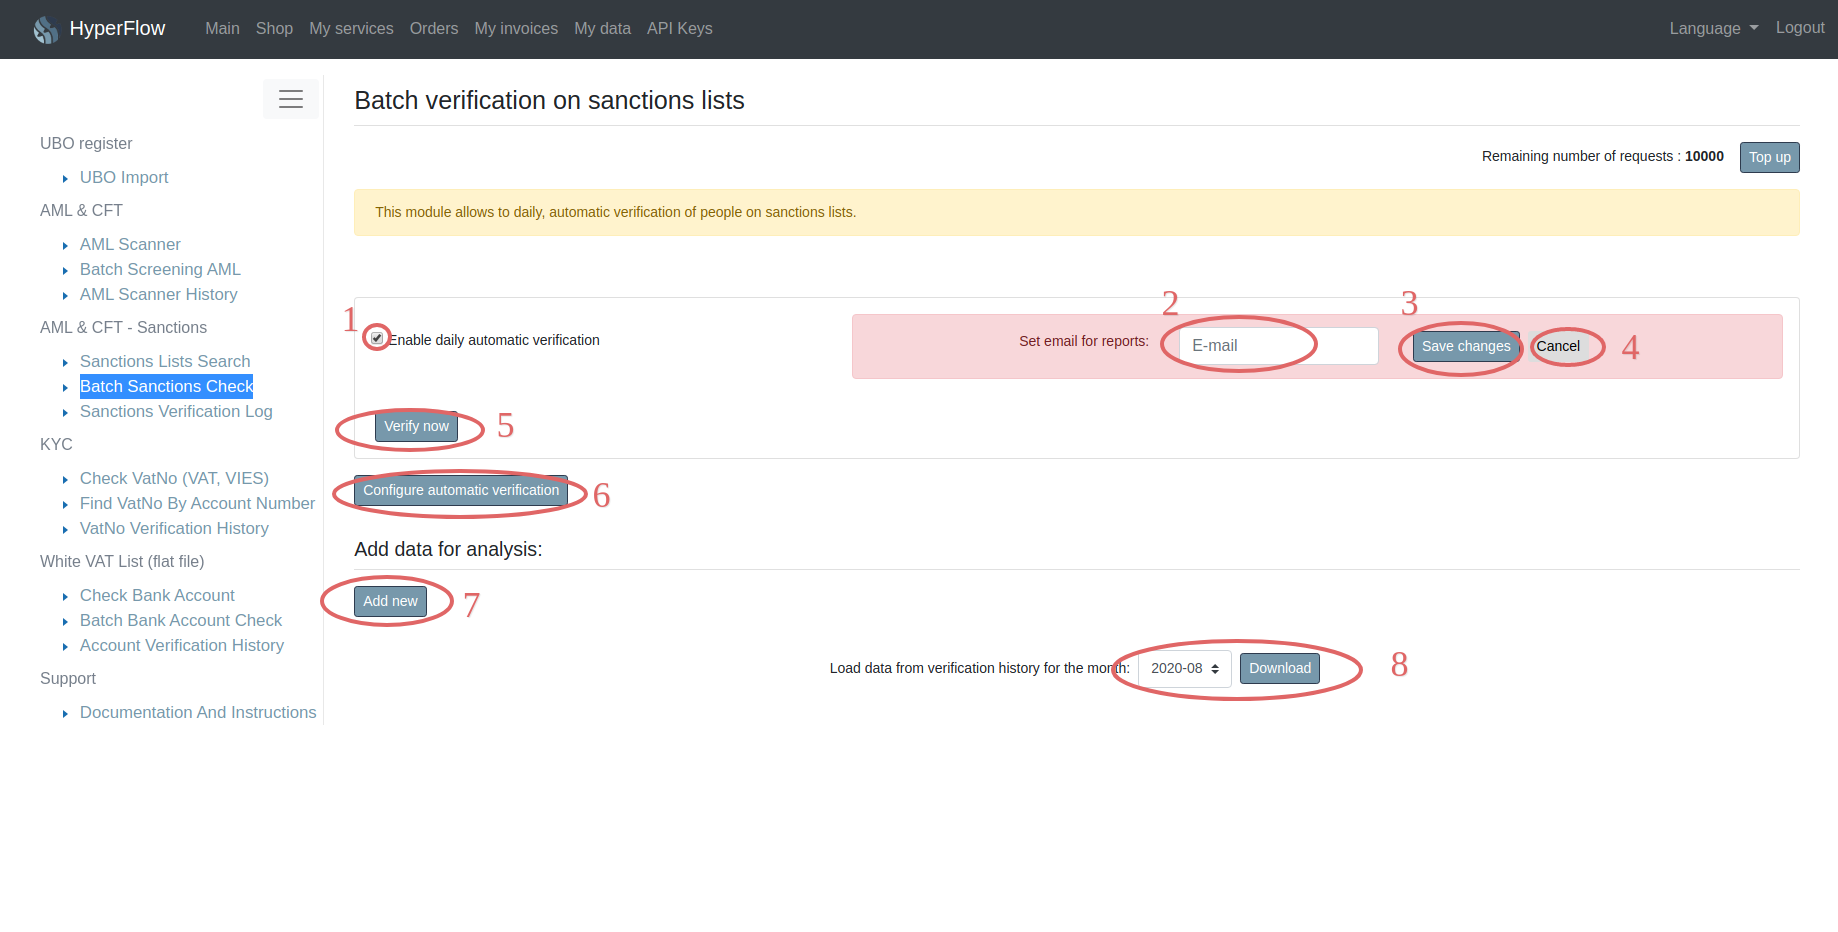
In the picture above, point 1 has been marked with the automatic verification checkbox. Selecting this option and saving the settings (point 3 in the figure) results in cyclical, daily verification of the data entered for automatic analysis on the sanctions lists. Point 2 in the figure allows you to enter an email address, where reports will be sent (number of verified persons / companies, number of persons / companies appearing on sanctions lists, list of names that were found on sanctions lists), but it is not necessary. The results of the analysis will also be visible in the analysis panel and in the Sanctions Verification Log. After making the necessary changes, always confirm the entered data by clicking “Save changes” (point 3). To stop modifying the settings, click “Cancel” (point 4).
The “Verify now” button is used to verify data upon request. Once you’ve entered your data or configured download, you can perform on-demand analyzes without waiting for a machine to perform analyzes overnight.
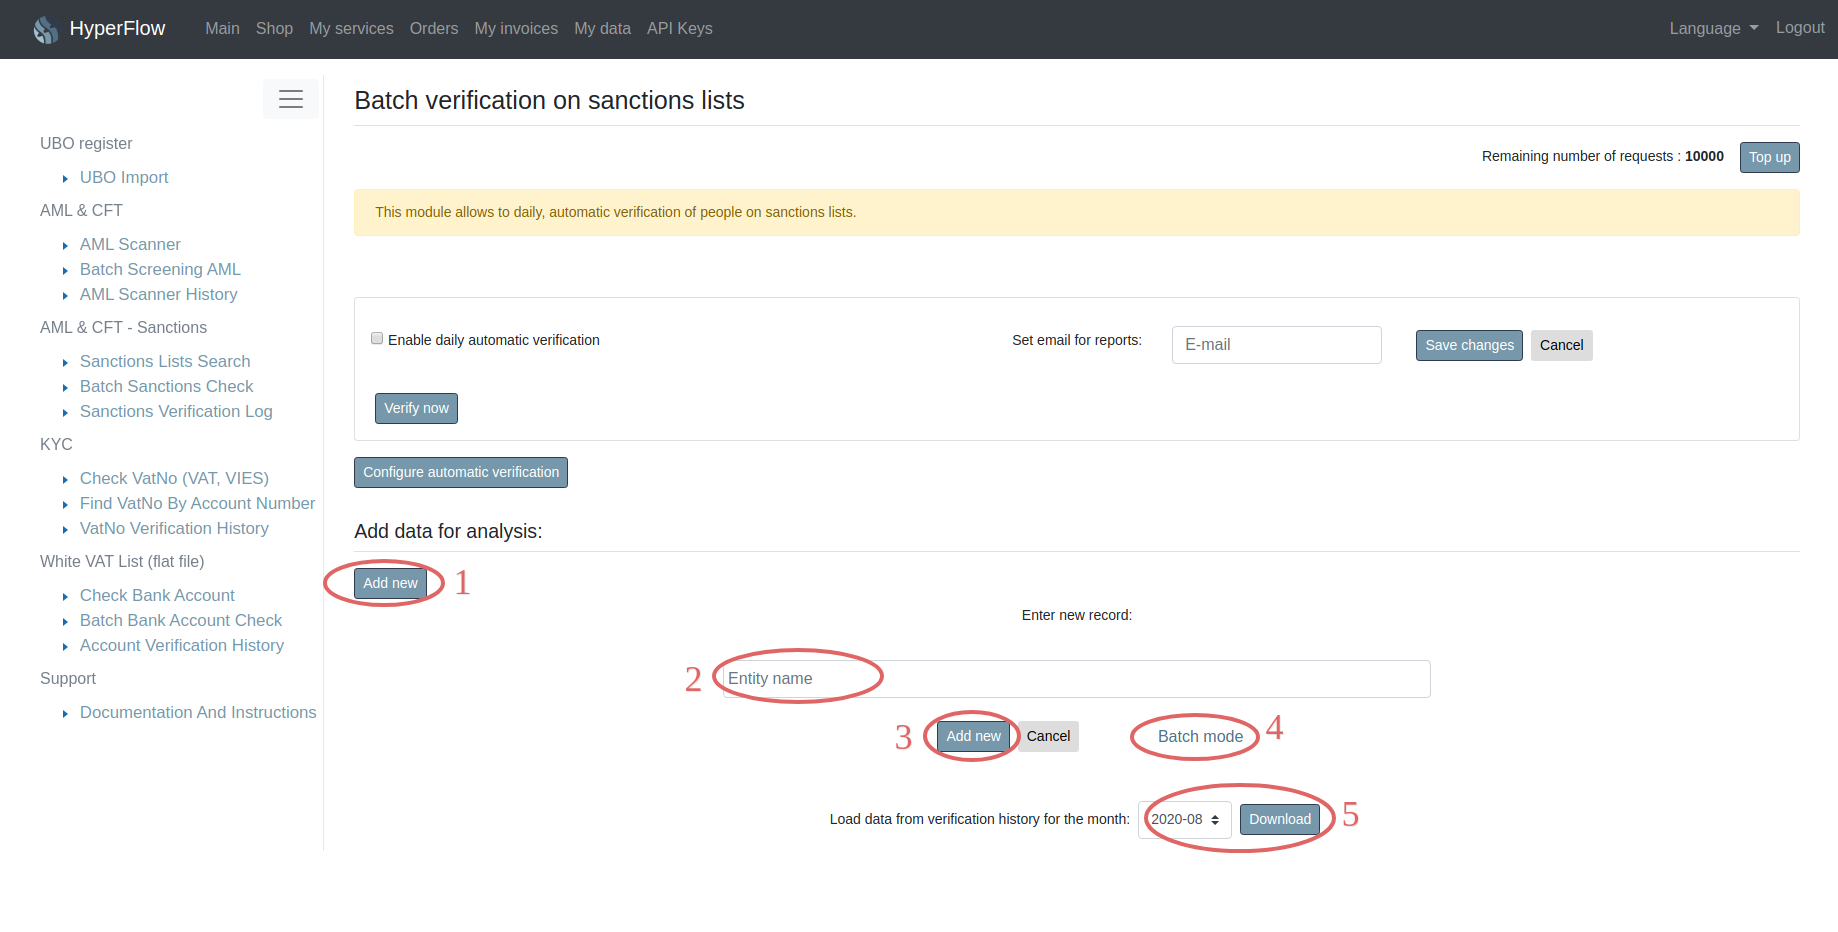
Point 6 in figure 4.1 indicates the configuration of the automatic data download machine. You can read more about this feature in the next section of the documentation. Step 7 is the “Add new” button. This option is available only if there is no automatic data download configuration.
Point 8 in figure 4.1 is download data from previous months.
4.3. Data download configuration
After clicking the button “Configure automatic data download”, the configuration panel of the automatic data download opens – Figure 4.2. We have three options to choose from. Each change of the configurator settings must be confirmed with the “Save” button. To cancel changes, click the “Cancel” button.

4.3.1 Automatic download disabled
This means that data for analysis will not be collected from external sources, and the analysis (if the machine – Figure 4.1 point 1 is on) will only cover data previously entered for analysis and contained in the database.
4.3.2 Remote file CSV
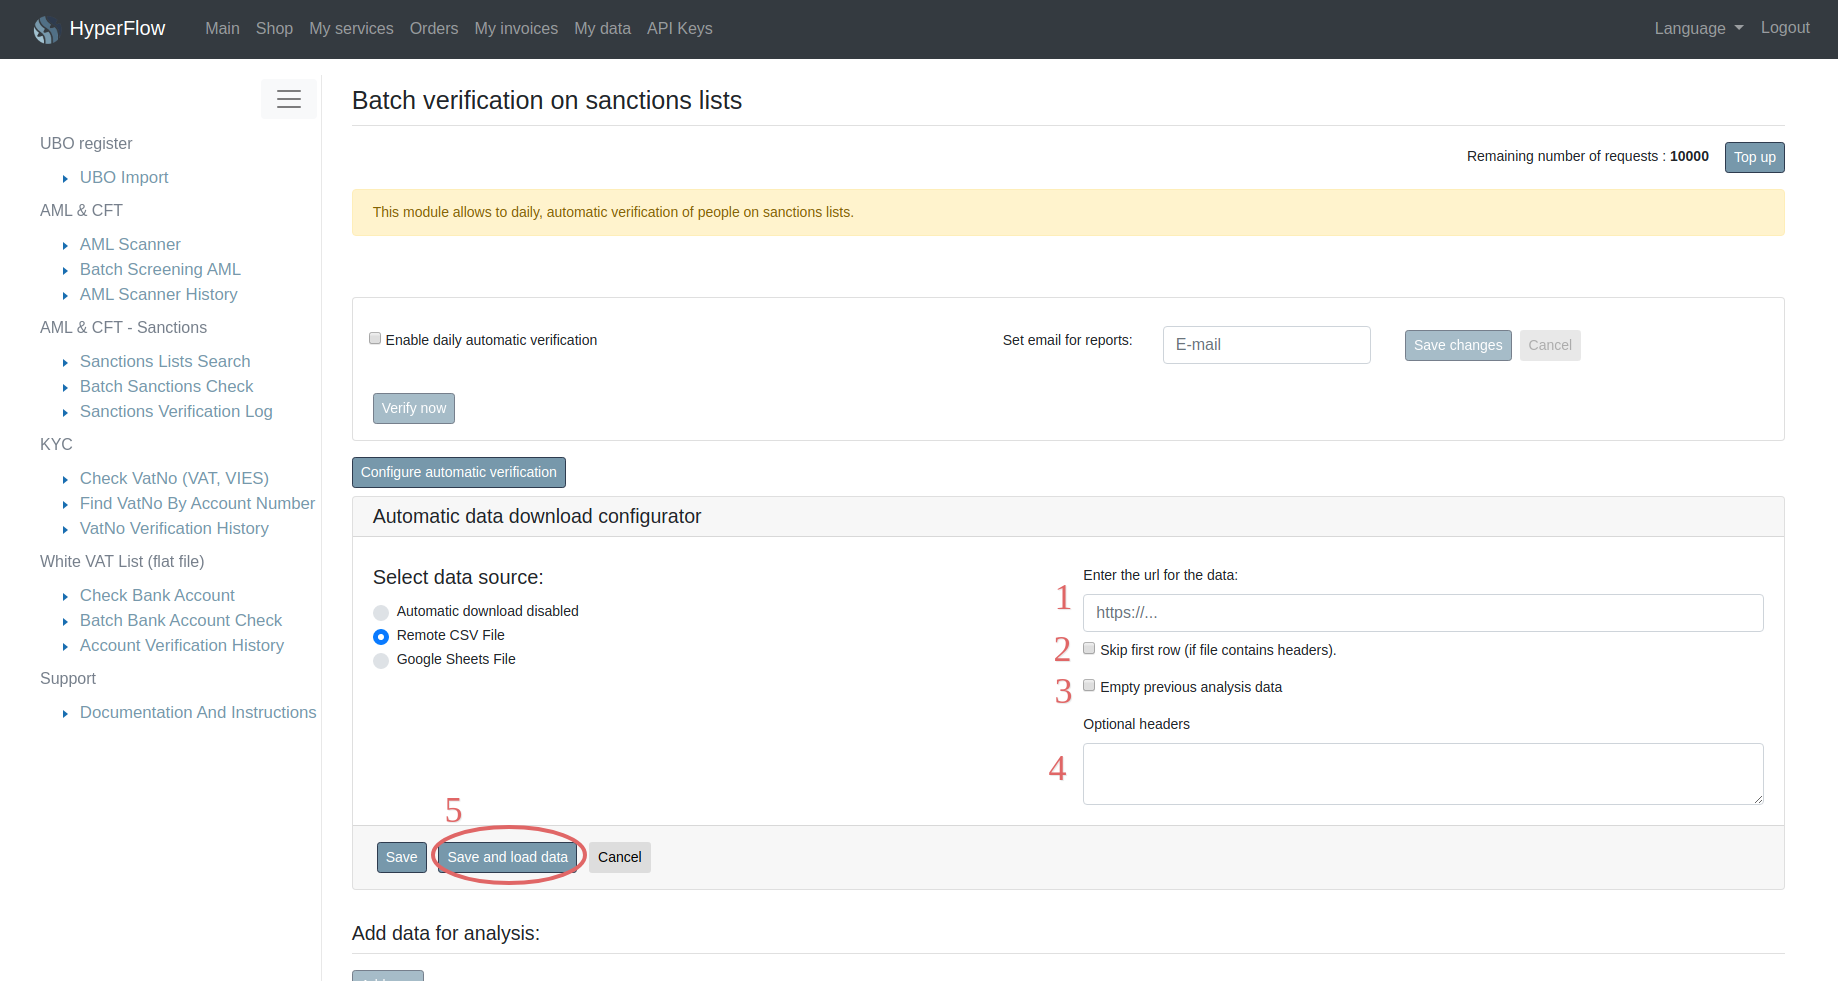
Selecting the “Remote CSV file” option allows you to enter data from a file. In this case, enter the path to the remote file (for example, on another server) in step 1, figure 4.3.
Point 2 in Figure 4.3 should be checked if the file contains a header row (a row with column content description).
Point 3 should be checked if the checked data are to be retrieved from a file each time. This option is useful when we complete the list of contractors in the file on an ongoing basis – that is, add and remove contractors, modify their data in the file. Then, each verification will download new data for verification, and the old data will not be verified. Leaving this option unchecked leaves the data from the previous analysis for verification along with the data from the current file.
Point 4 allows you to enter additional HTTP headers needed to read the file (e.g. HTTP Basic authorization or tokens).
4.3.3 Google sheet
The configurator for google spreadsheets looks very similar to the configuration for a remote CSV file discussed above.
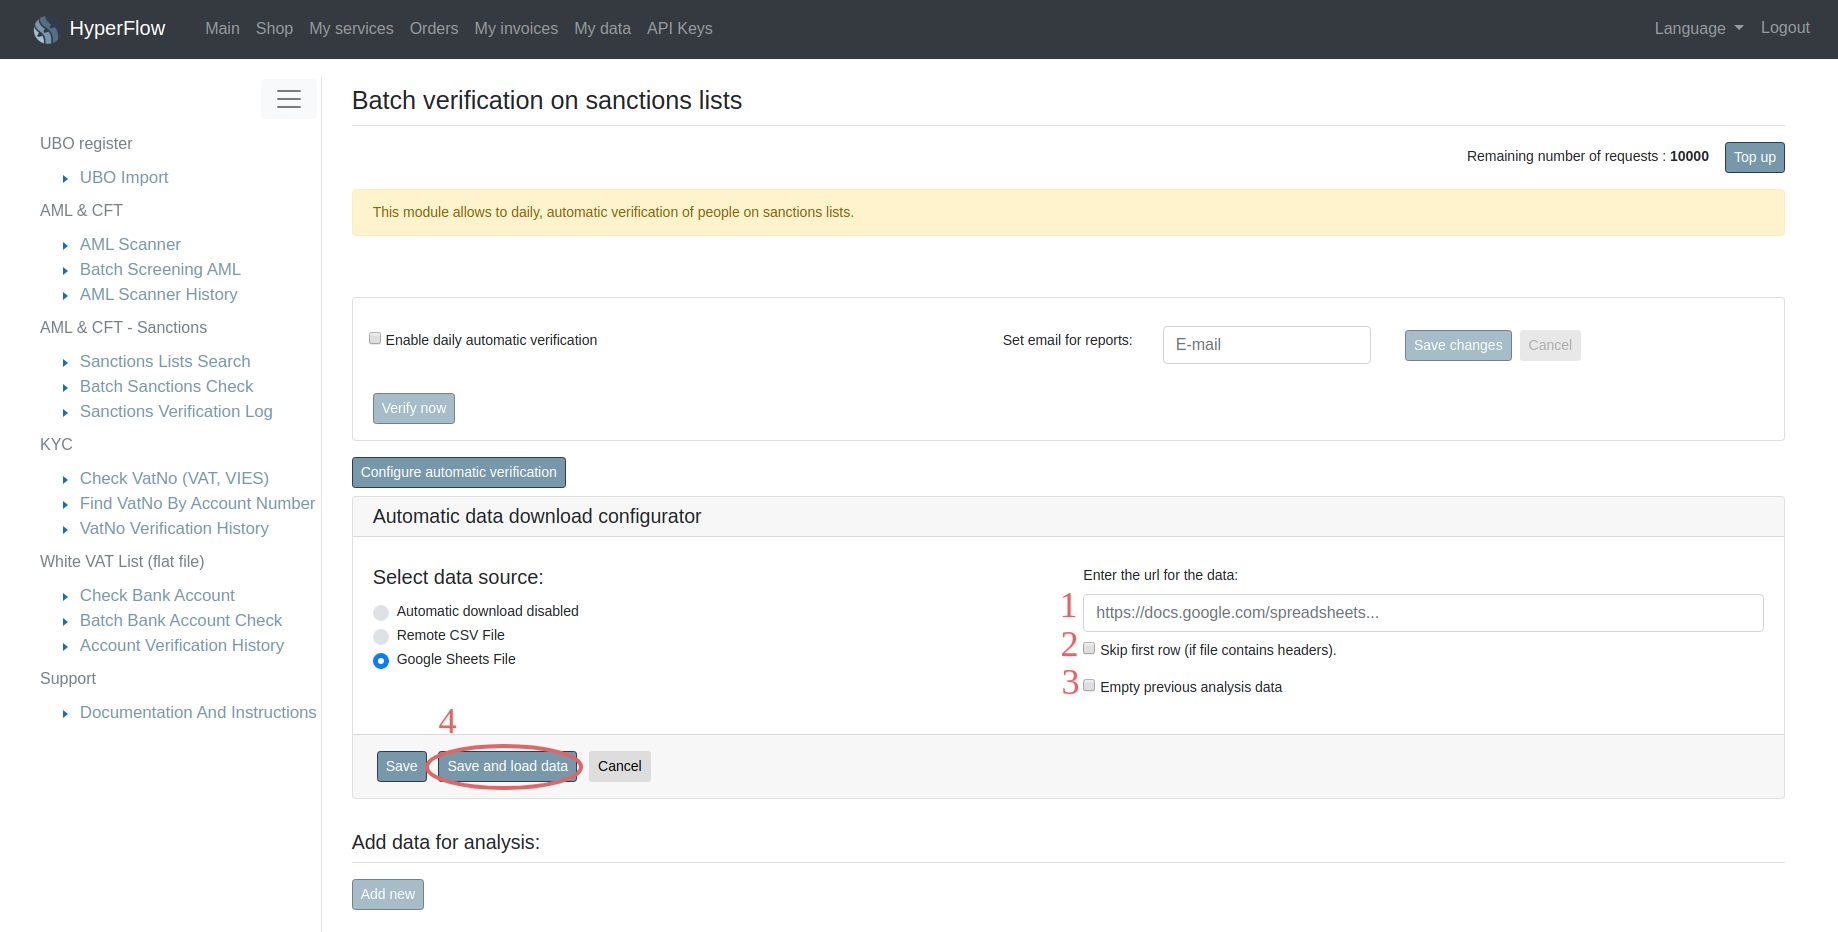
Point 1 in Figure 4.4 is the location for the google file path. Selecting the option marked by point 2 results in skipping the header line – the first line of the file. Selecting the option marked point 3 deletes the previously entered data for analysis.
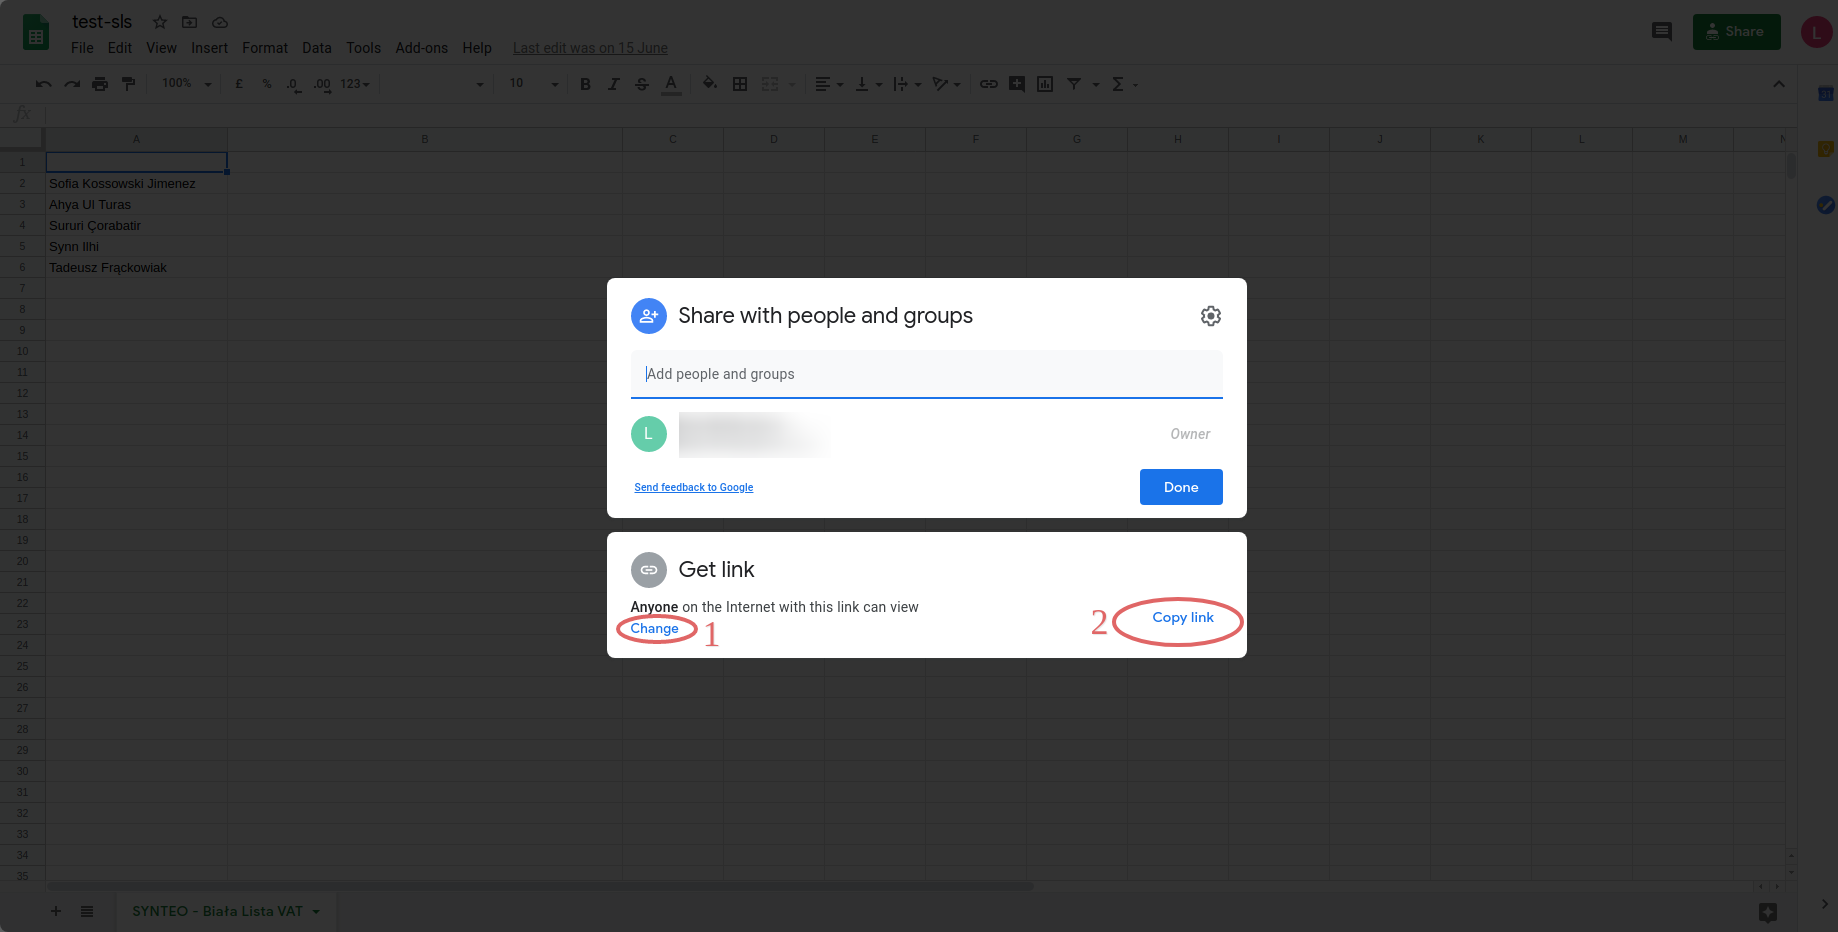
In order to use a data source in the form of a google spreadsheet, it must first be prepared and made available in Shareable by Link mode.

Figure 4.5 shows the prepared google sheet with test data, which can be used both for verification on sanctions lists and PEP lists. To read the application file, click the “Share” button marked in fig. 4.5, and then change the access to the file – “Change to anyone with the link” to “Anyone with the link” with the “Viewer” option.
Then click the “Copy link” option (Figure 4.6) to copy the sheet address and paste it into the verification configuration (ctrl + v).
4.3.4 Confirmation of configuration
Each time after making changes to the configuration, save the new settings with the “Save” button. For CSV file and google file, there is also an option to save and load data to verify the given path and other settings. “Save and load data” (fig. 4.3 item 5 and fig. 4.4 item 4) results in entering new data into the buffer.
NOTE: if the option of clearing the buffer is selected in the configuration, it will be done every time the data is loaded. This means that each time any changes made to the data in the buffer will be overwritten by the data from the file.
4.3.5 One-time loading of data from a file
In order to load data from a file once and then modify them already inside the automatic verification service, you must configure properly downloading data from a remote csv file or from a google spreadsheet and save the data by clicking “Save and load data”. Check the data loaded into the analysis buffer, then reconfigure remote data download to “Automatic download disabled” and save the changes. In this way, we will have the data without the option of overwriting them from the file, and only the originally added set will be analyzed, taking into account the changes made manually.
4.4. Manual data entry
To be able to add data manually, select and save the “Automatic download disabled” option in the configurator. With such a configuration, it is possible to add and modify resources in the automatic analysis database.
Manual data entry is carried out in the same way as in the case of a single verification, which is described in chapter 3. Sanctions lists – verification of this documentation.
To add data manually: individually, in bulk, or from a csv file from a computer, click the “Add new” button – point 1 in Figure 4.7 , enter the name of the person / company / organization (point 2) and confirm with the button “Add new”. Point 4 in Figure 4.7 is for batch data entry as for Single Verification.
What is new, however, is loading data from the verification history. It is used to load data of people / companies that have already been verified. In order to upload data of several months, you must select the desired months from the list one by one, each time clicking the “Download” button (point 5 fig. 4.7).
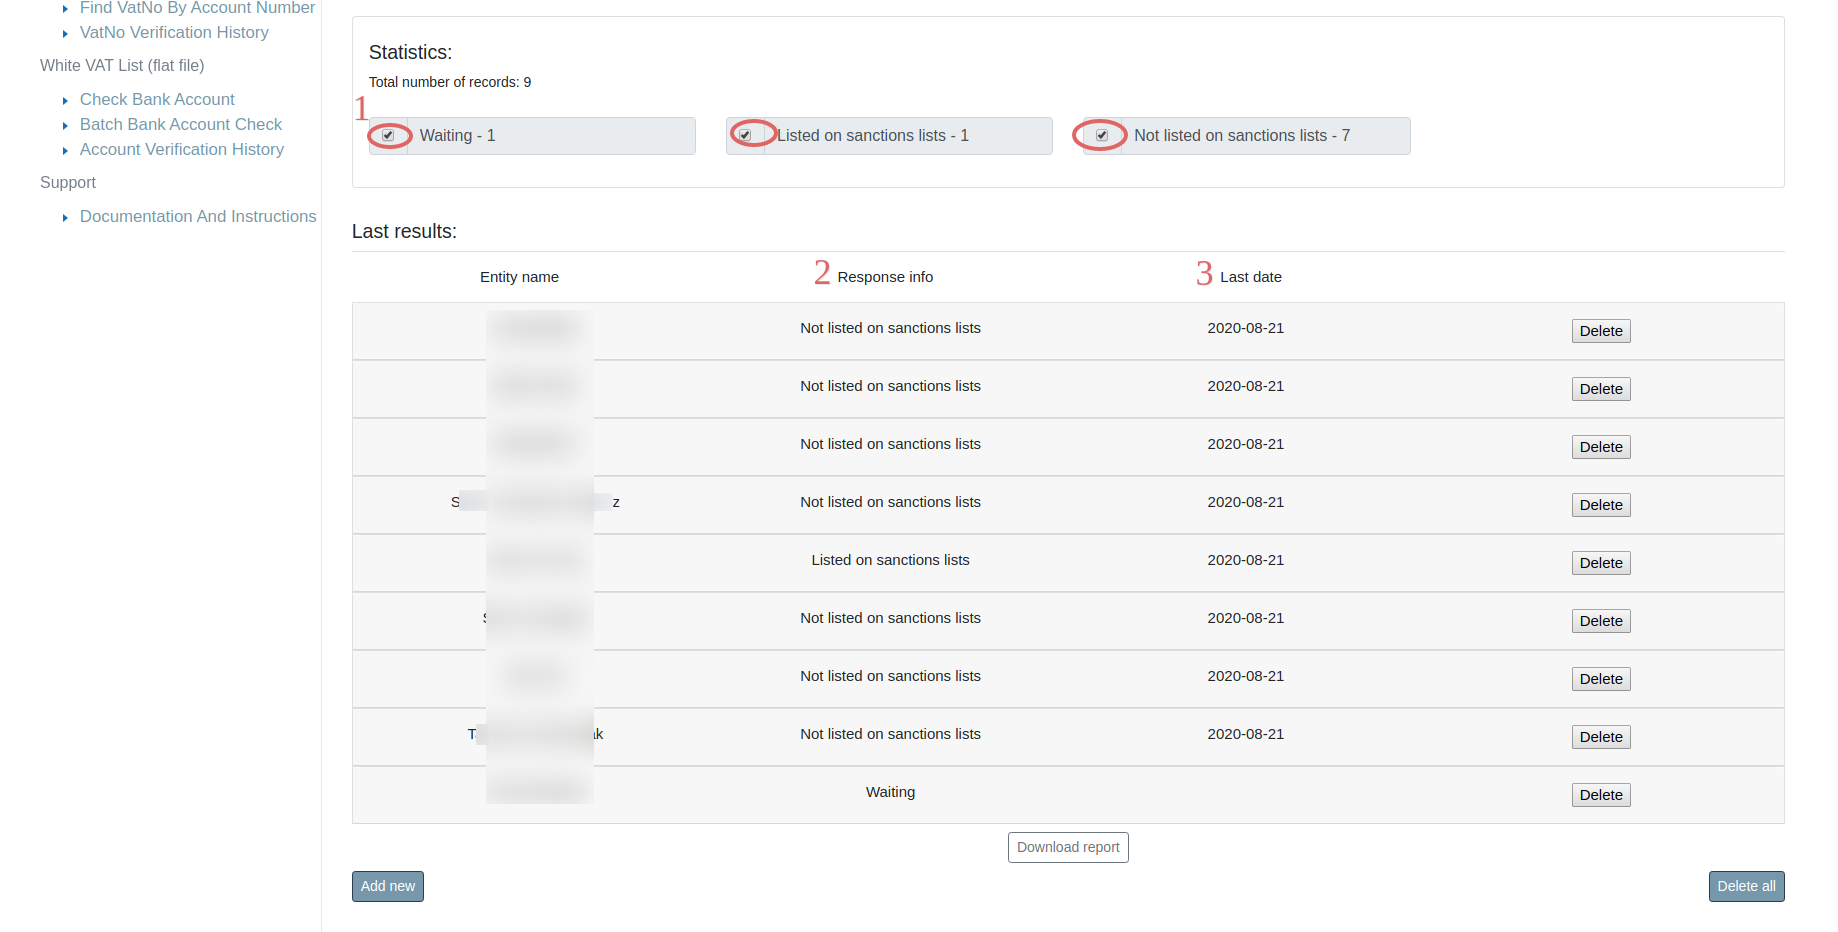
4.5. Data modification in analysis
If the data buffer is not empty, statistics (Figure 4.8, point 1) for the entered data and the results of the last analysis will be available on the module panel. If data has been entered but has not yet been analyzed, it will have the “Waiting” status. If the configurator is set to “Automatic download disabled”, we can modify the data set that will be analyzed.

In Figure 4.8, point 2, the “Delete” button has been marked for a single data record. Point 4 in Figure 4.8 allows you to delete all data saved for analysis.
The button for downloading the collective report has been marked with point 3 in Figure 4.8. The report covers only the data from the last verification and does not include historical data. The “Sanctions Verification Log” tab is used to view the verification history.
If the data has been analyzed, the statistics will easily allow you to filter records with different verification statuses.
In Figure 4.9, point 1 has been marked for filtering data using statistics. Unchecking one or more types of status allows you to quickly find and view the scope of data you are interested in. The “Results of the last analysis” section contains data for each record in the form of the analysis result (item 2, fig. 4.9) and the date of verification (item 3, fig. 4.9).
Chapter 5. Sanctions Verification Log
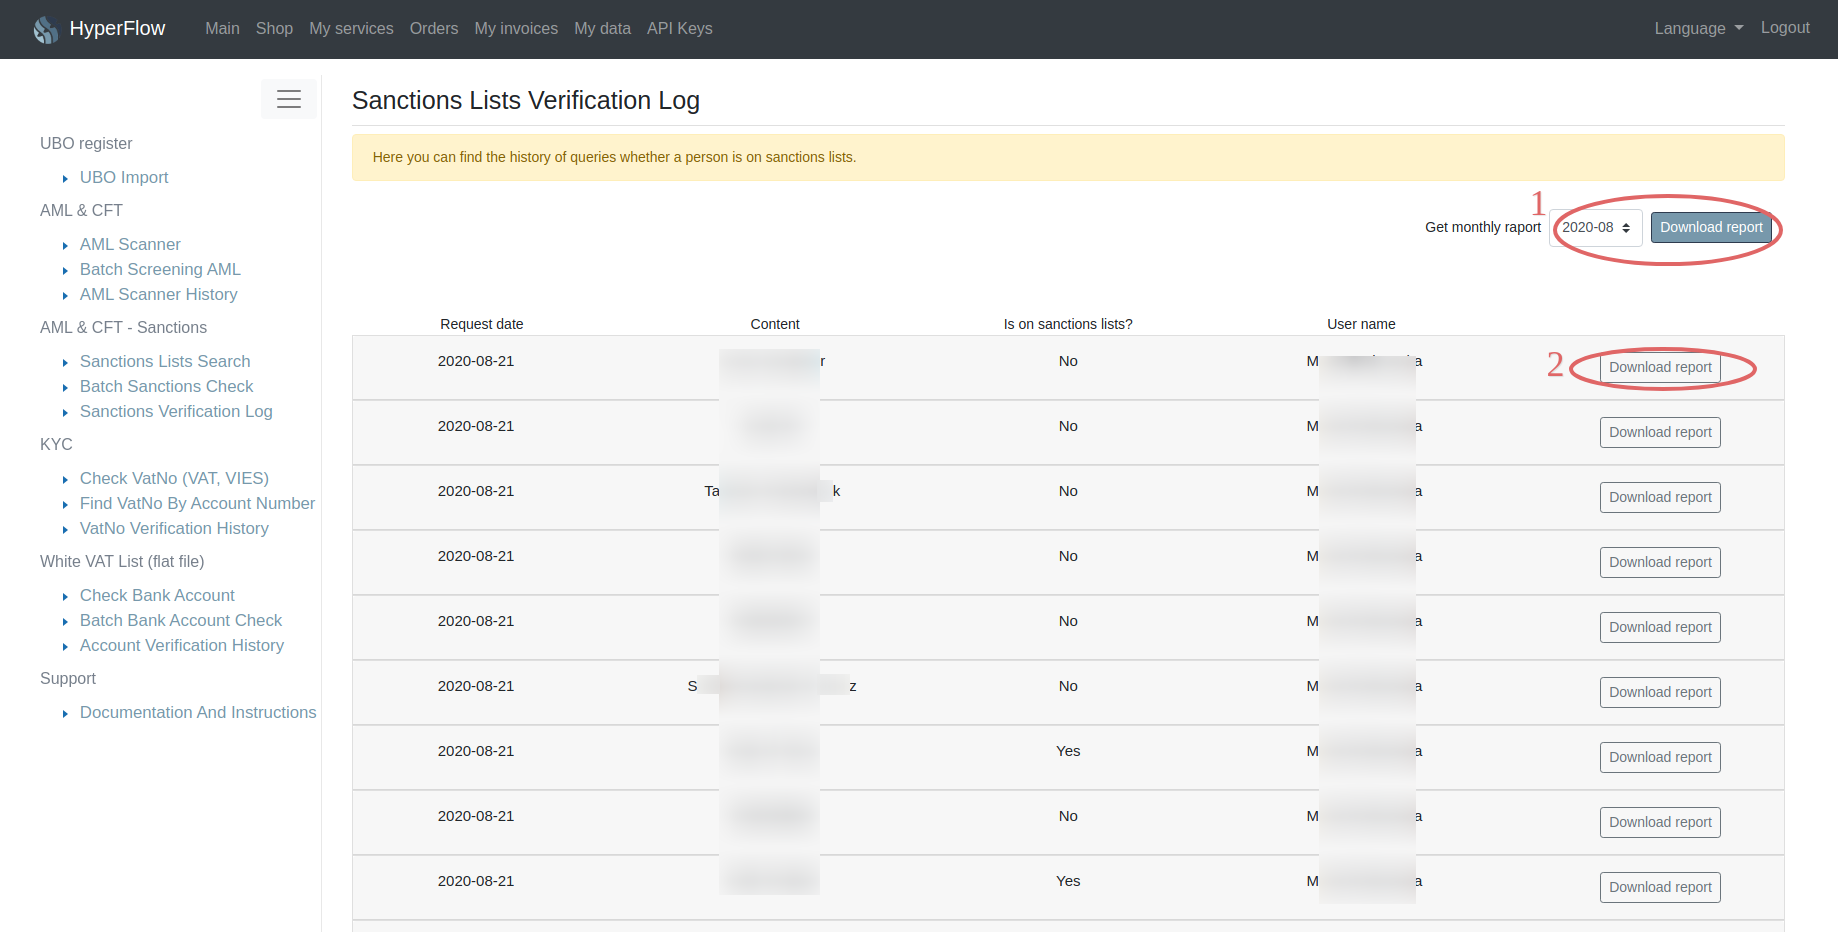
Sanctions Verification Log is used to view archived data and verification results.
The data is collected in order of queries and the last 100 verification records for which an individual report is available are displayed (Figure 5.1, point 2).
5.1. Individual reports
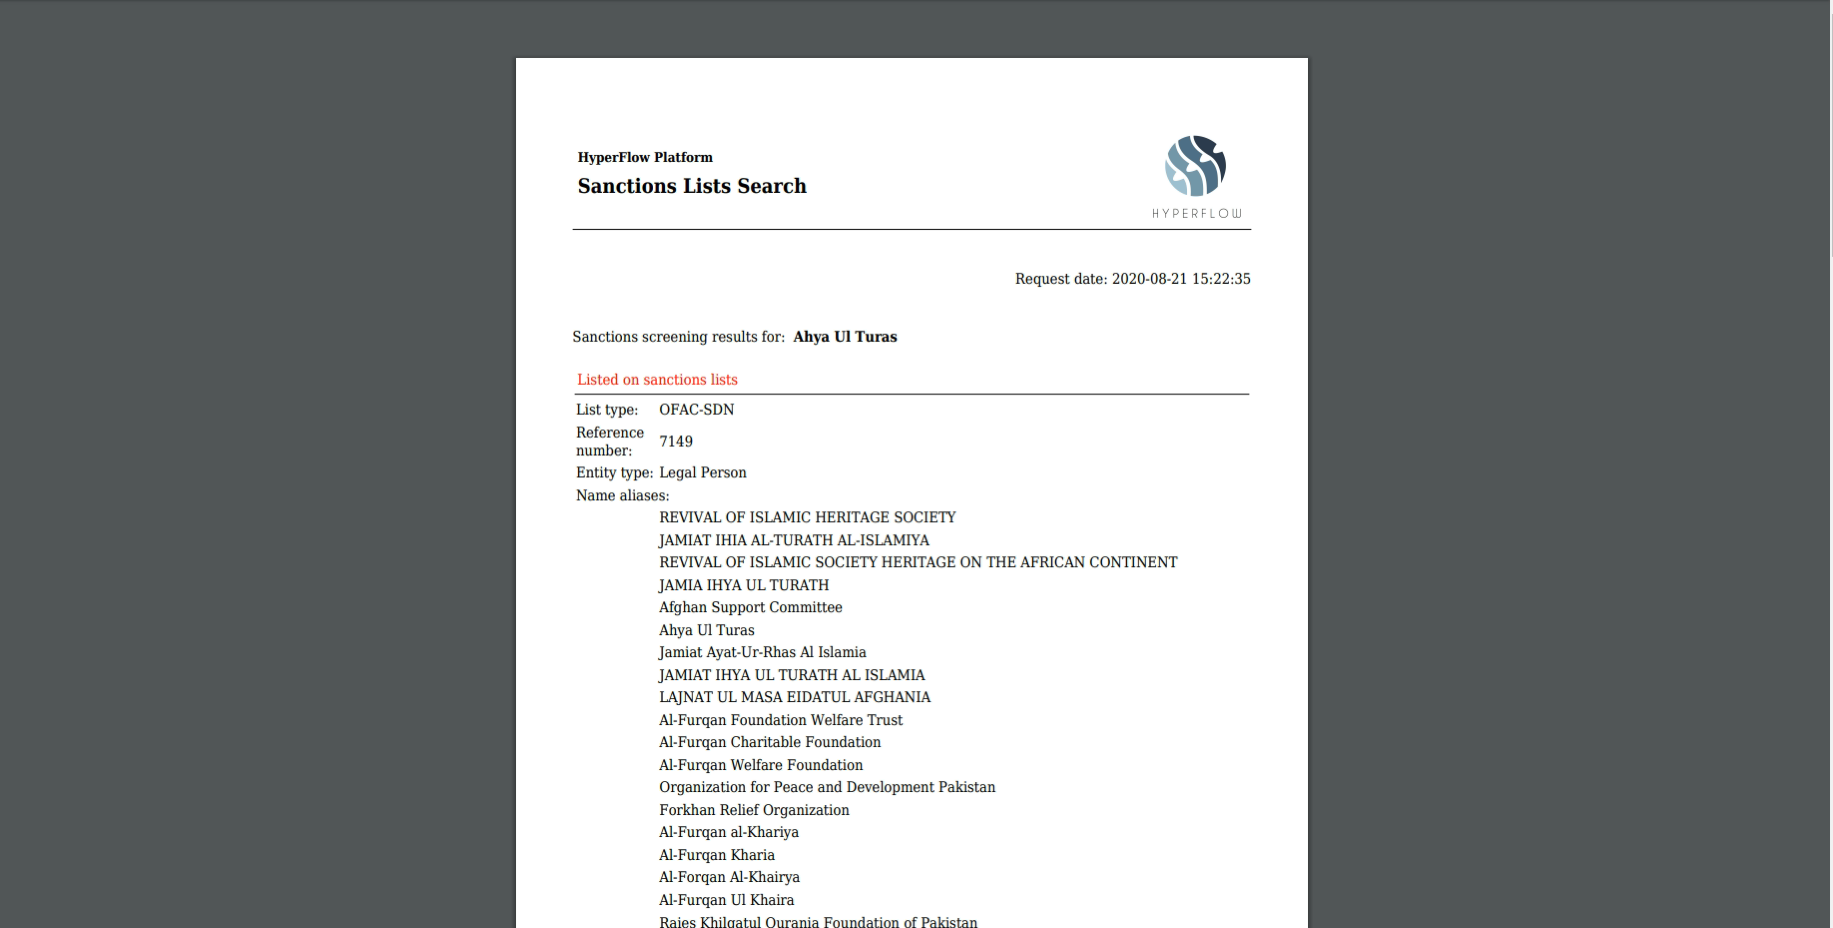
Individual reports, that can be downloaded here, contain all data about single request (Fig.5.2).
5.2. Summary reports
Summary reports (Figure 5.1, point 1) can be downloaded for each non-empty month – that is, for each month in which at least one verification on the sanction lists was performed.
Summary reports are available in both csv and pdf file formats (Figure 5.3).
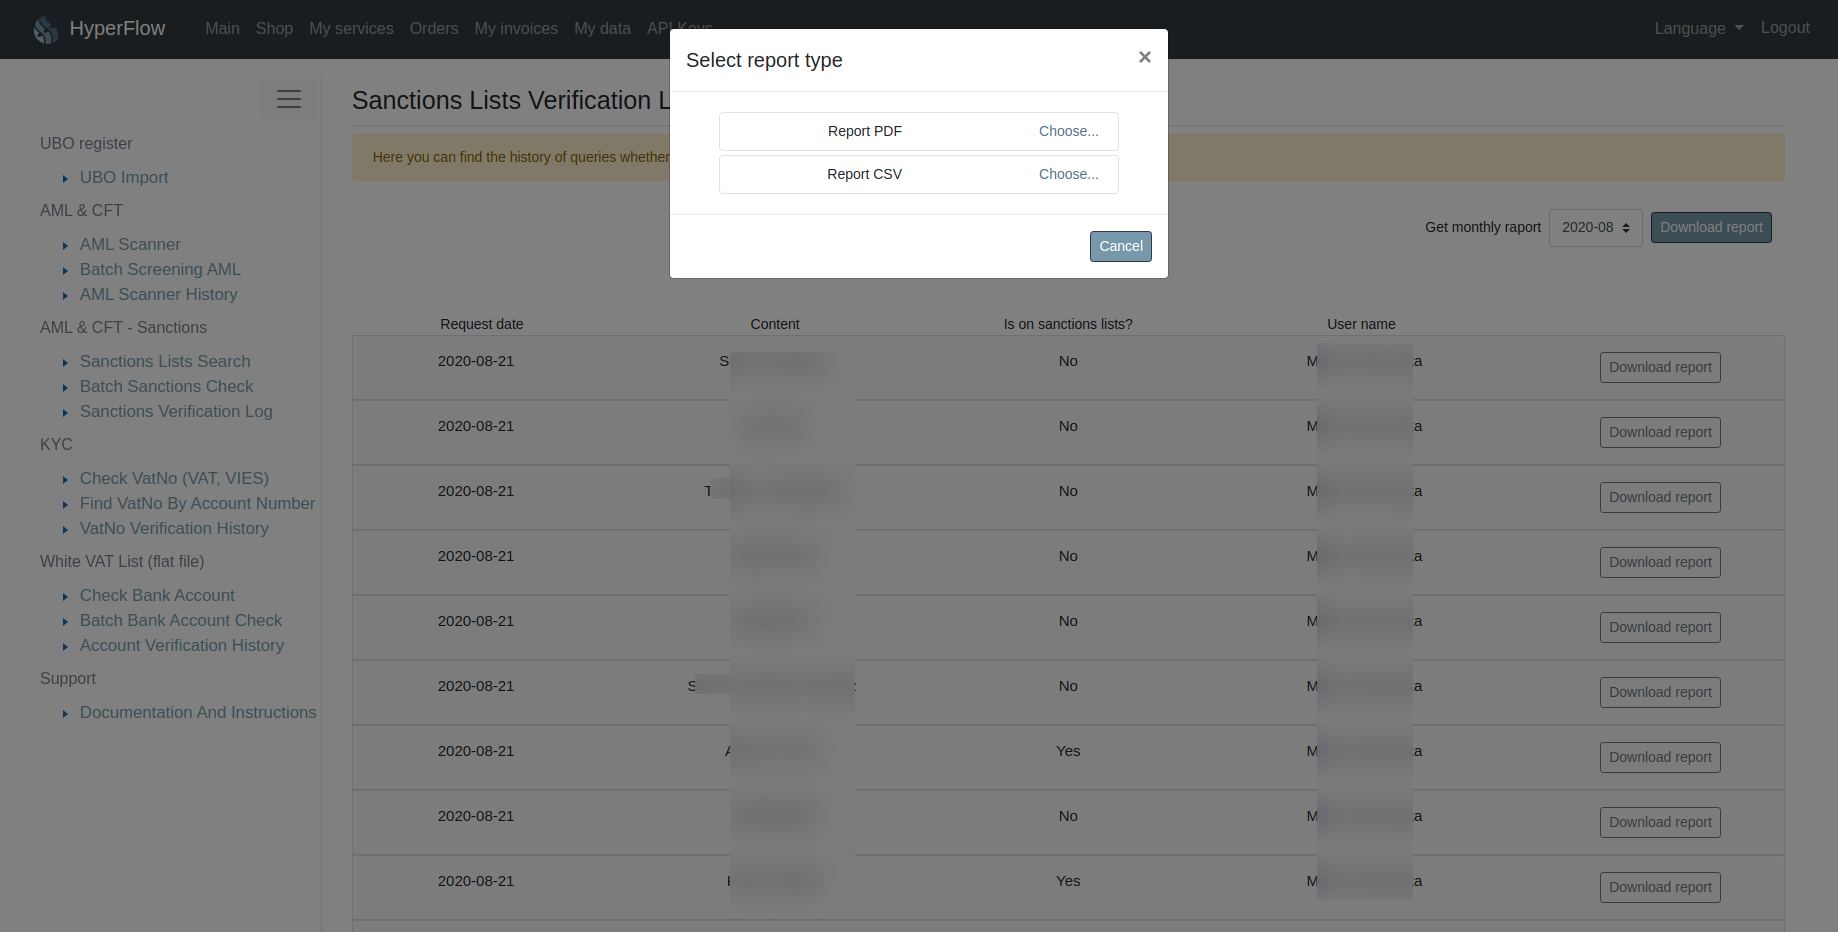

The PDF Report contains the same data as the verification log view: request date, the content of request, the response whether the person/company is on sanctions lists and the user name.
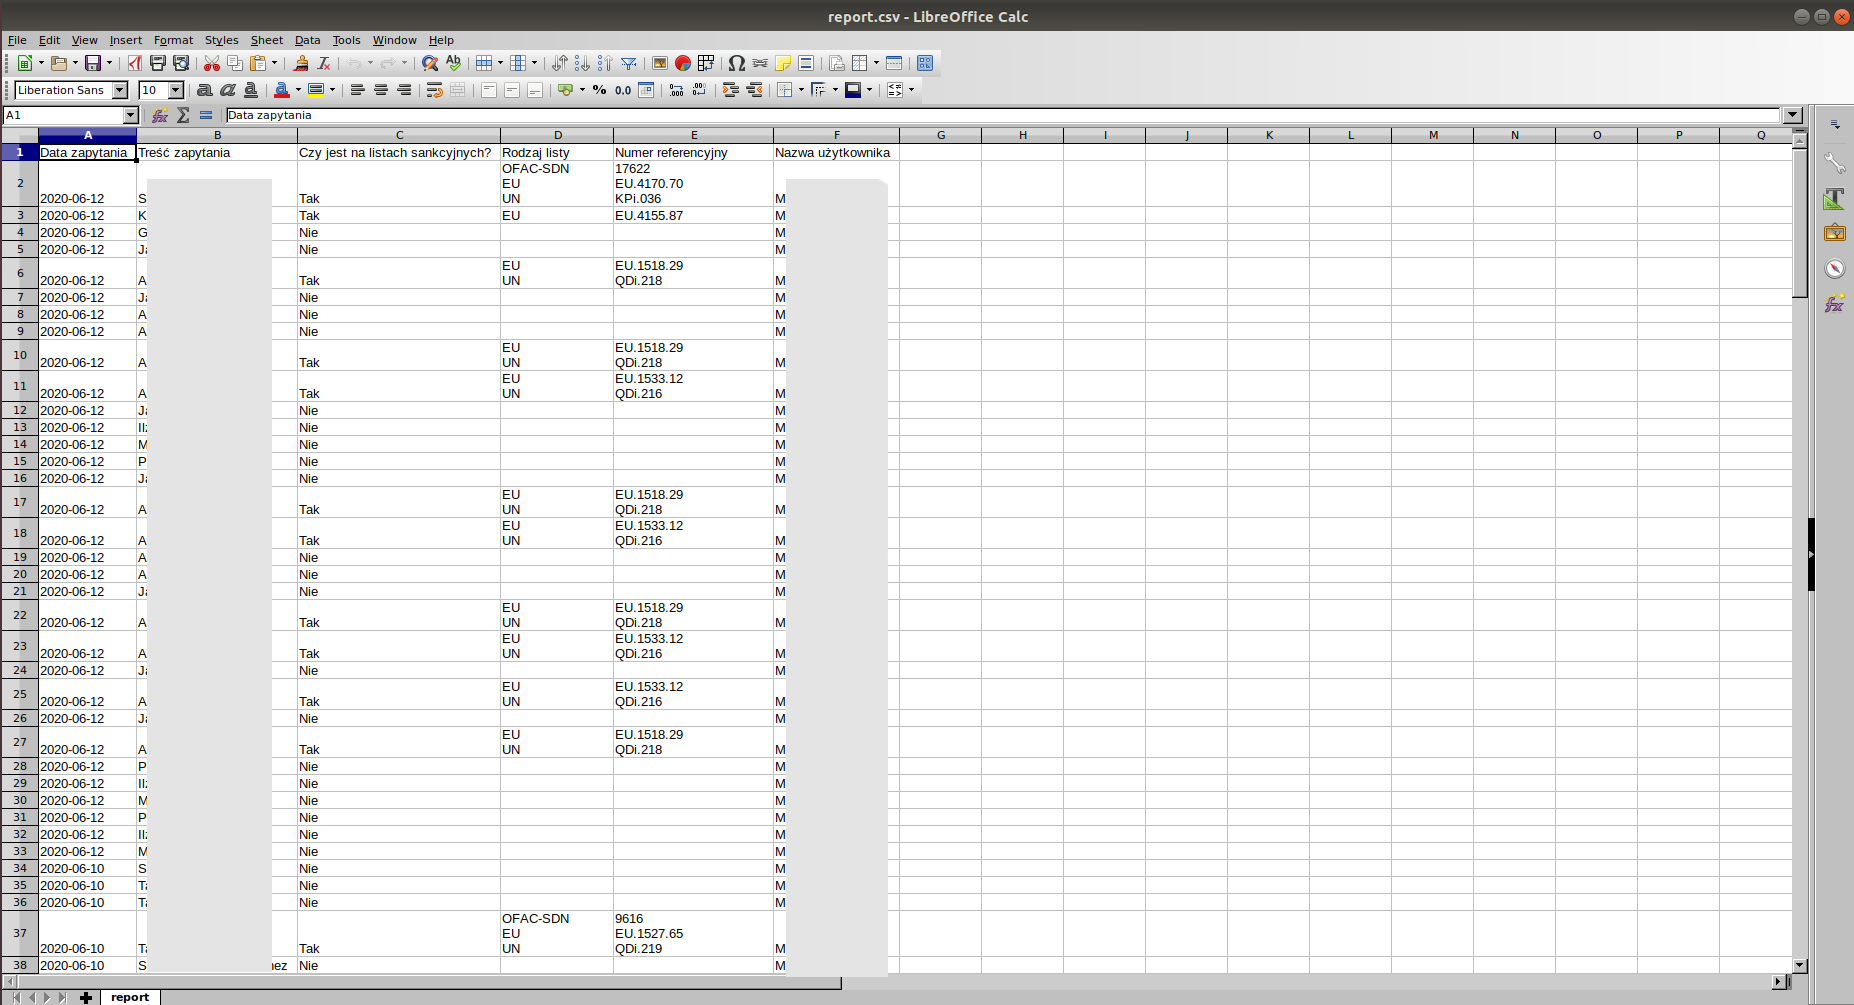
The csv report contains detailed data of requests i.e.:
request date, request content, the response, whether there are any sanctions, types of sanctions lists where the person or company is included, reference numbers of sanctions lists, user name.